XR829模组适配
本章节将讲解如何在 TinaSDK5 适配 xr829 模组,并生成镜像。
获取环境变量
在ubuntu上,新建一个终端,进入TinaSDK5根目录,执行以下指令:
source build/envsetup.sh
其中:
- source build/envsetup.sh :获取环境变量。
ubuntu@ubuntu1804:~/T113-i/tina5sdk-bsp$ source build/envsetup.sh
NOTE: The SDK(/home/ubuntu/T113-i/tina5sdk-bsp) was successfully loaded
load openwrt... ok
Please run lunch next for openwrt.
load buildroot,bsp...ok
Invoke . build/quick.sh from your shell to add the following functions to your environment:
    croot                          - Changes directory to the top of the tree
    cbsp                           - Changes directory to the bsp
    cbsptest                       - Changes directory to the bsptest
    ckernel                        - Changes directory to the kernel
    cbrandy                        - Changes directory to the brandy
    cboot                          - Changes directory to the uboot
    cbr                            - Changes directory to the buildroot
    cchips                         - Changes directory to the board
    cconfigs                       - Changes directory to the board's config
    cbin                           - Changes directory to the board's bin
    cdts                           - Changes directory to the kernel's dts
    ckernelout                     - Changes directory to the kernel output
    cout                           - Changes directory to the product's output
    copenssl                       - Changes directory to the product's openssl-1.0.0
Usage: build.sh [args]
    build.sh                       - default build all
    build.sh bootloader            - only build bootloader
    build.sh kernel                - only build kernel
    build.sh buildroot_rootfs      - only build buildroot
    build.sh menuconfig            - edit kernel menuconfig
    build.sh saveconfig            - save kernel menuconfig
    build.sh recovery_menuconfig   - edit recovery menuconfig
    build.sh recovery_saveconfig   - save recovery menuconfig
    build.sh buildroot_menuconfig  - edit buildroot menuconfig
    build.sh buildroot_saveconfig  - save buildroot menuconfig
    build.sh clean                 - clean all
    build.sh distclean             - distclean all
    build.sh pack                  - pack firmware
    build.sh pack_debug            - pack firmware with debug info output to card0
    build.sh pack_secure           - pack firmware with secureboot
Usage: pack [args]
    pack                           - pack firmware
    pack -d                        - pack firmware with debug info output to card0
    pack -s                        - pack firmware with secureboot
    pack -sd                       - pack firmware with secureboot and debug info output to card0
ubuntu@ubuntu1804:~/T113-i/tina5sdk-bsp$
这样,就可以使用相应的指令来配置xr829模组。
内核设备树修改
查看原理图
对于wifi功能需要查看的引脚:
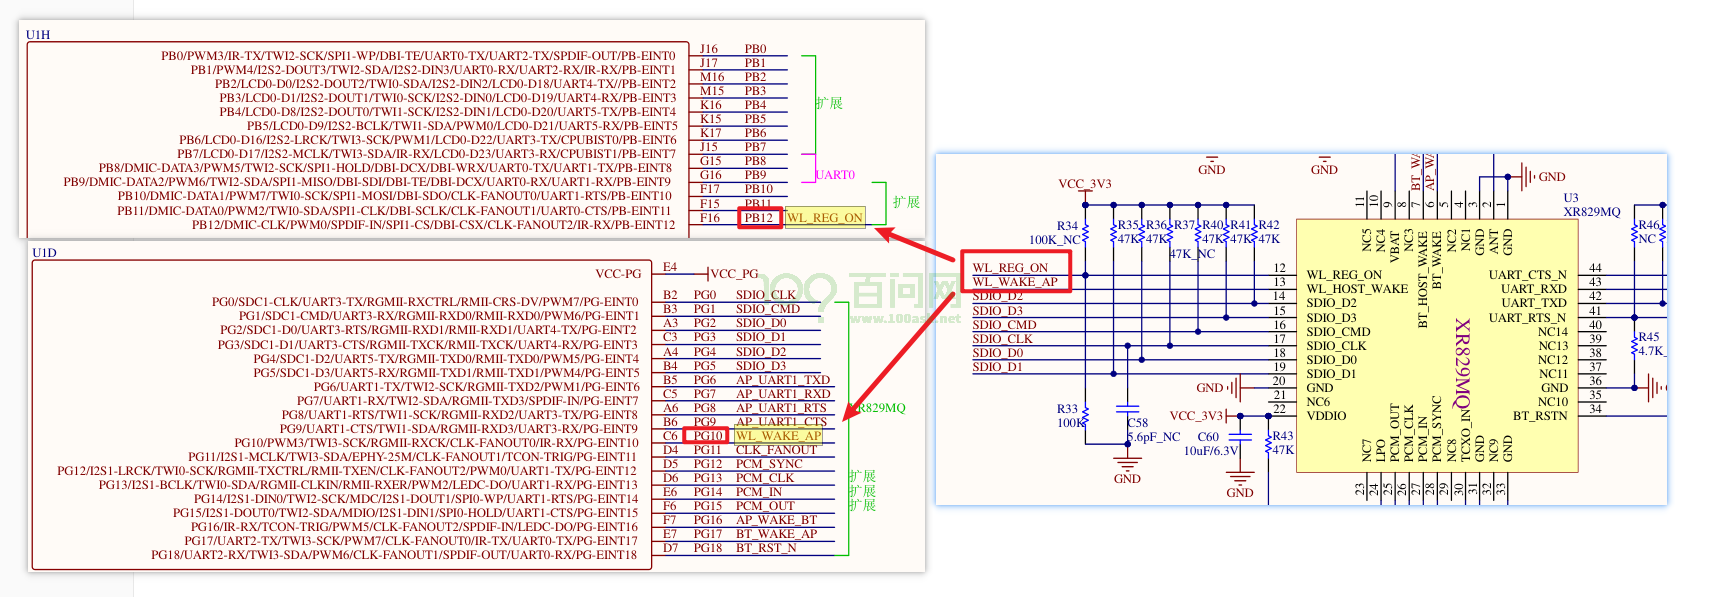
由图可知,
WL_REG_ON 对应的引脚是 ==> PB12
WL_WAKE_AP 对应的引脚是 ==> PG10
对于蓝牙功能需要查看的引脚:
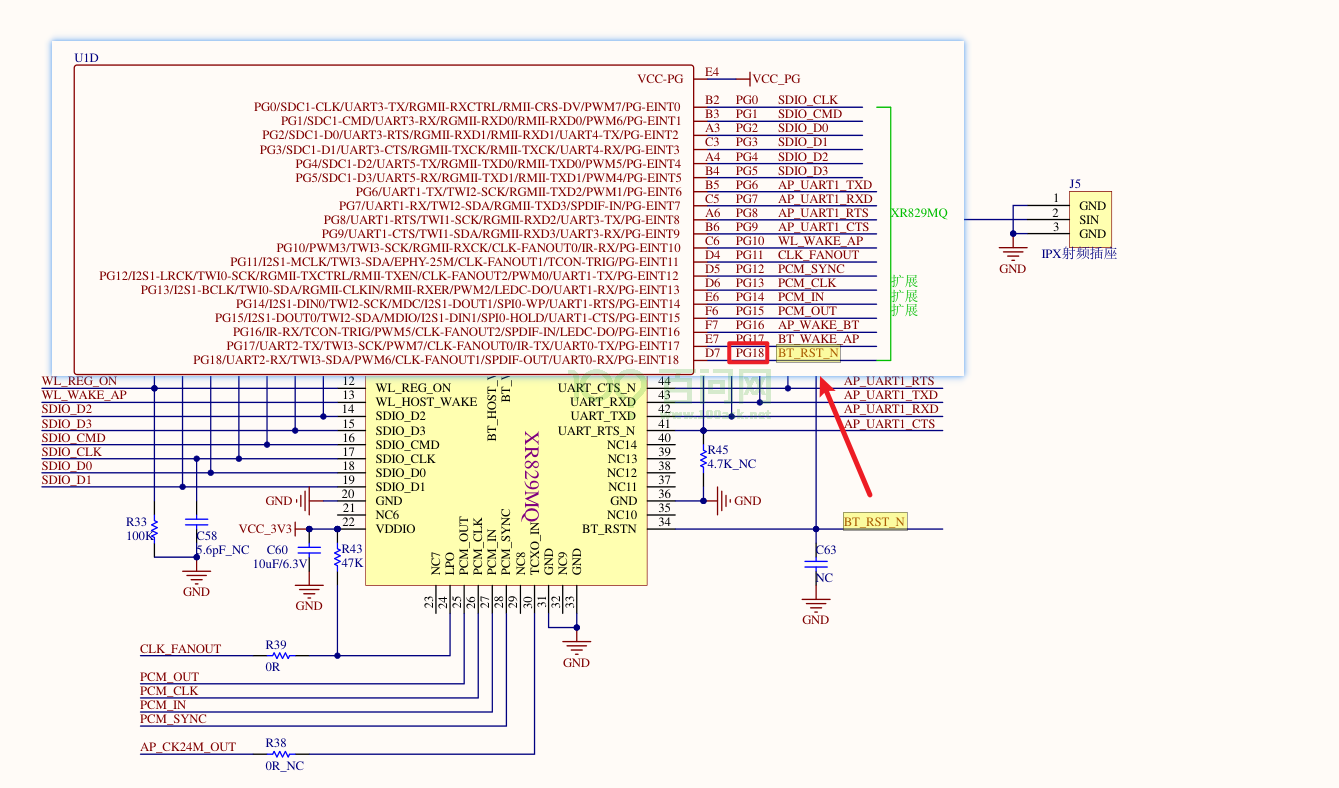
由图可知,
BT_RST_N 对应的引脚是 ==> PG18
修改内核设备树
在TinaSDK源码中,进入目录/device/config/chips/t113_i/configs/evb1_auto/linux-5.4
修改目录下的内核设备树文件board.dts
vim board.dts
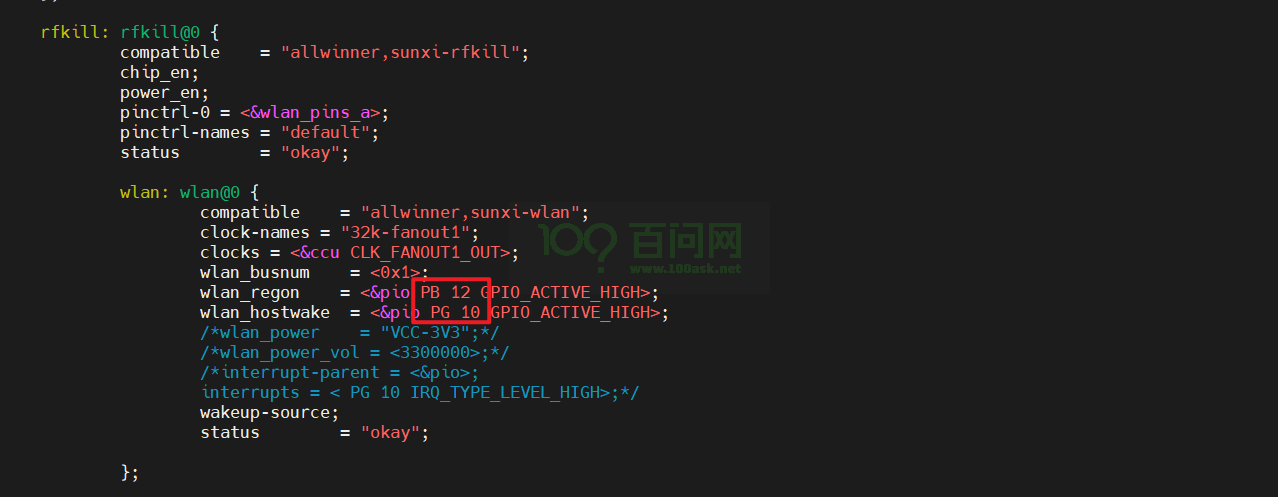
对于wifi设备树节点修改对应的引脚:
在普通模式下,键盘输入/wlan,找到wlan设备树节点,点击键盘上的i键,进入编辑模式,修改如下:
对于蓝牙设备树节点修改对应的引脚:
点击键盘的esc键进入普通模式,输入/bt,找到蓝牙设备树节点,点击键盘上的i键,进入编辑模式,修改如下:
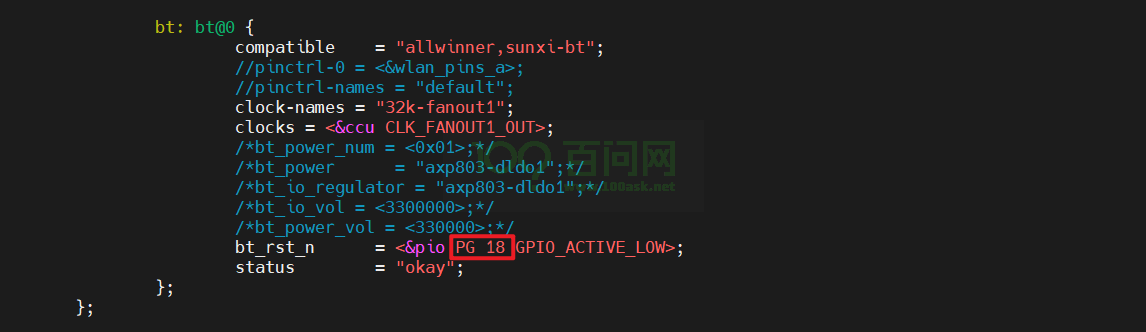
修改完成后,普通模式下,输入:wq,回车之后,即可保存退出。
内核配置选择
进入TinaSDK源码目录,
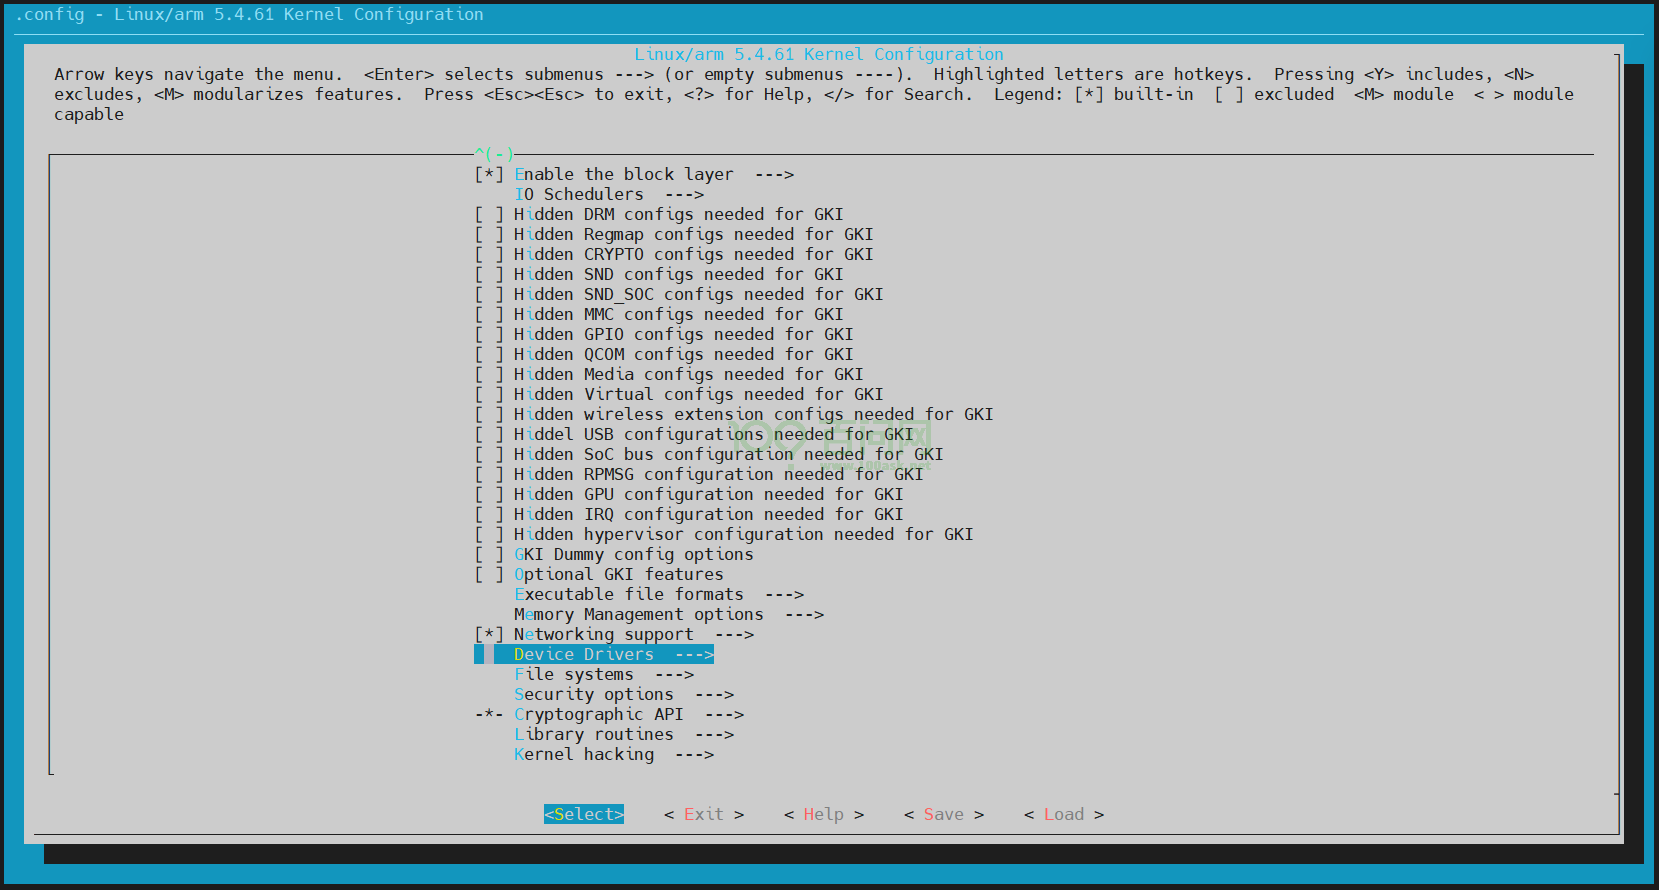
执行./build.sh menuconfig进入内核配置界面。
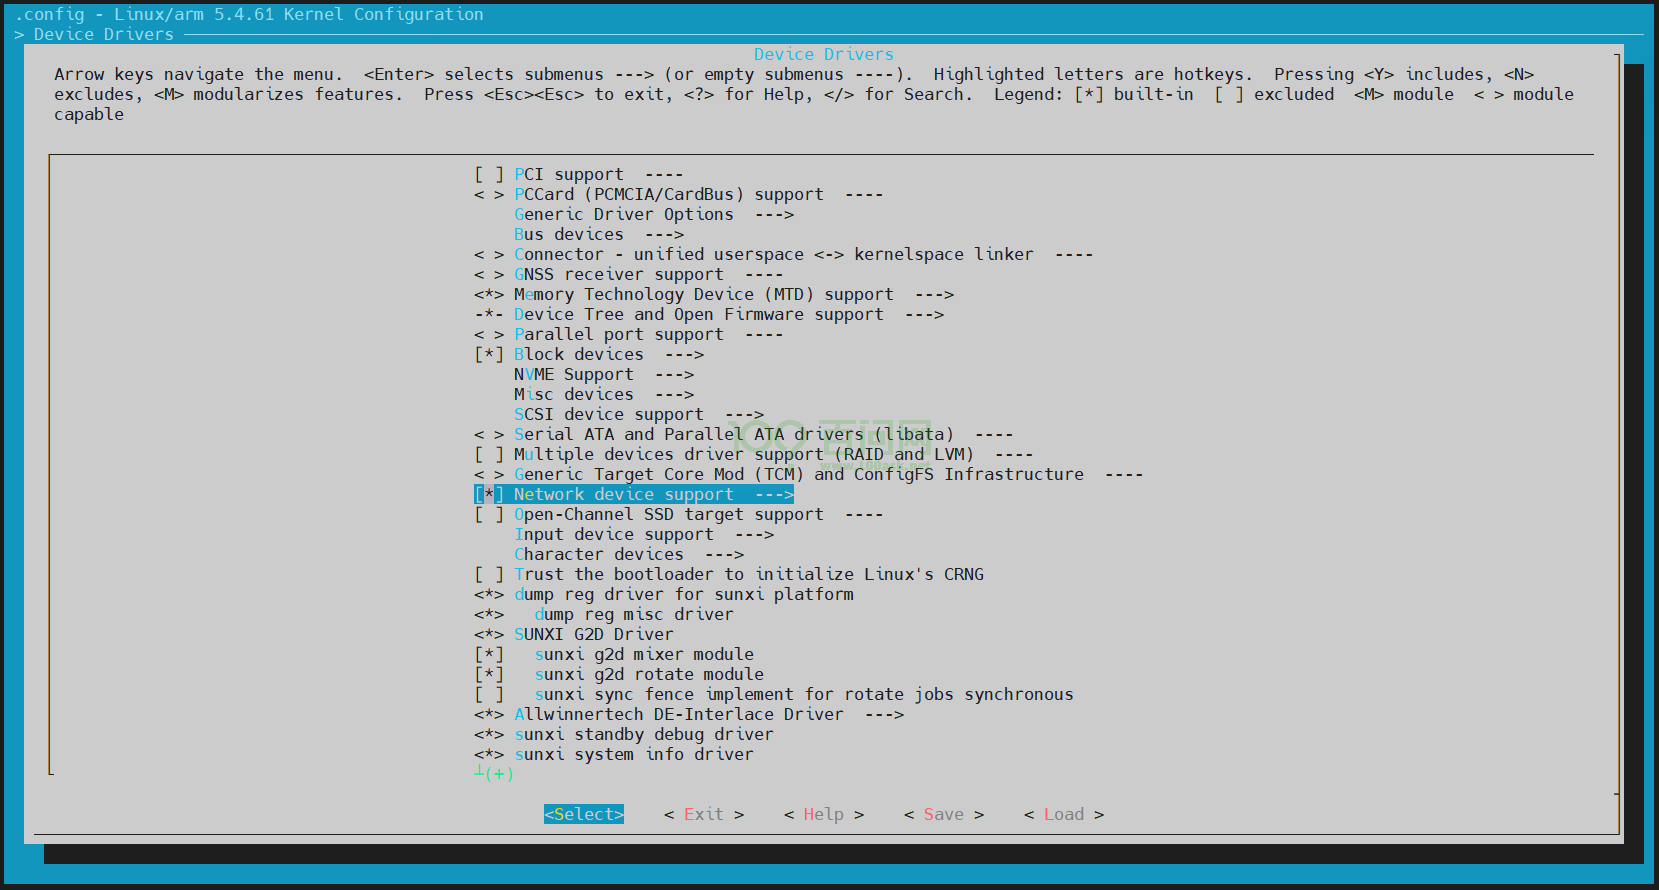
找到Device Drivers,回车进入。
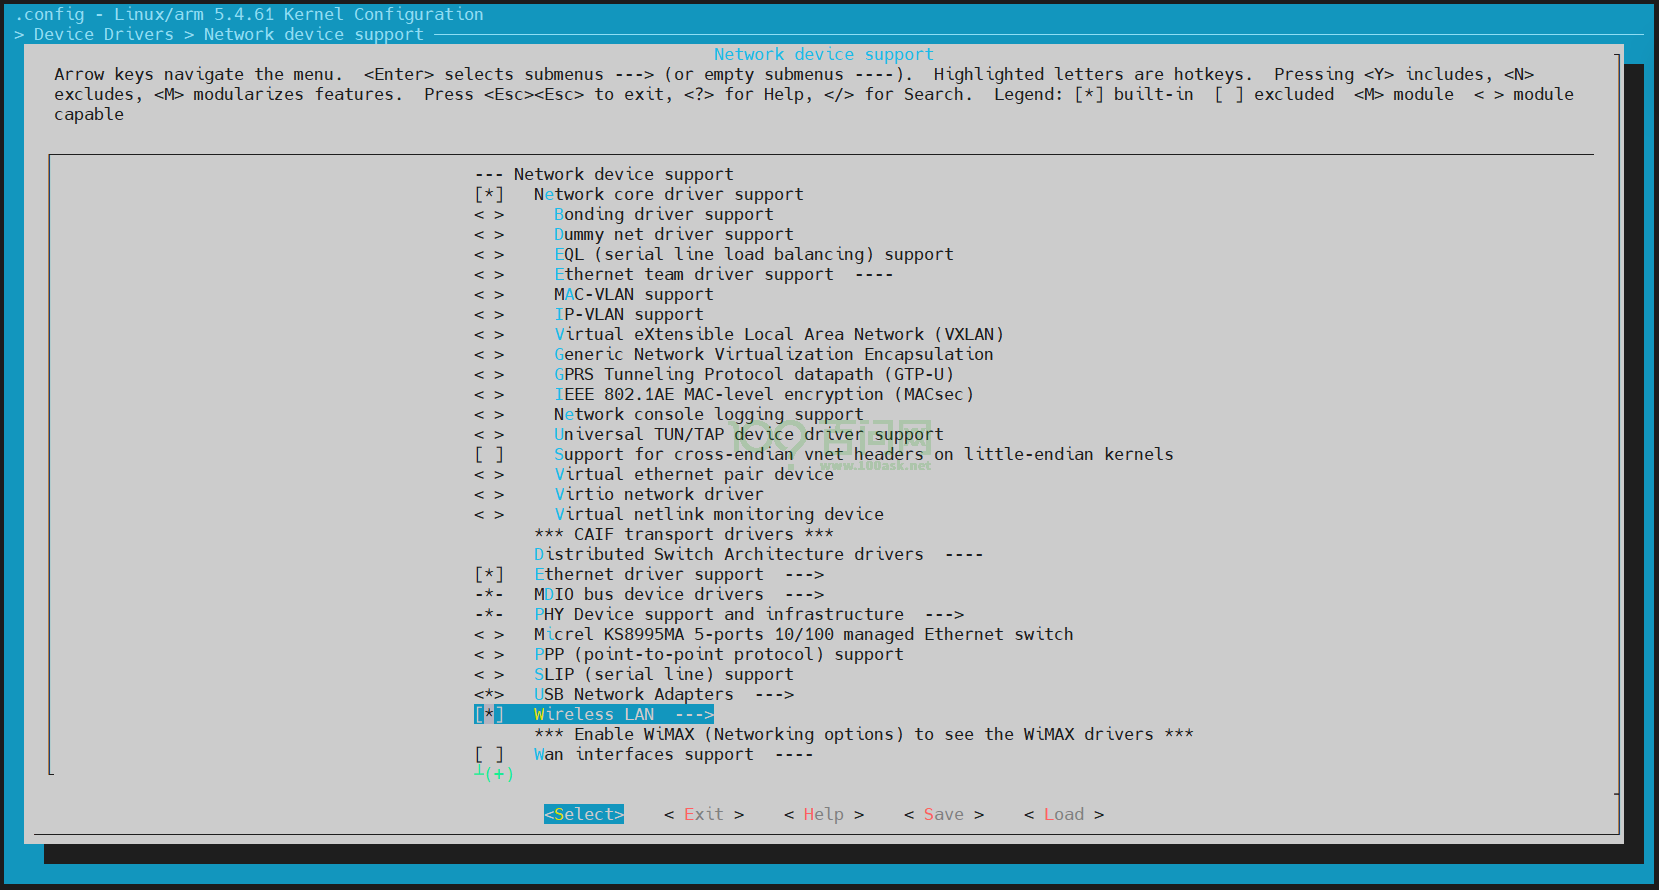
找到 Network device support,回车进入。
找到 Wireless LAN,回车进入。
找到XR829 WLAN support,按住键盘M,选为编译成内核模块。
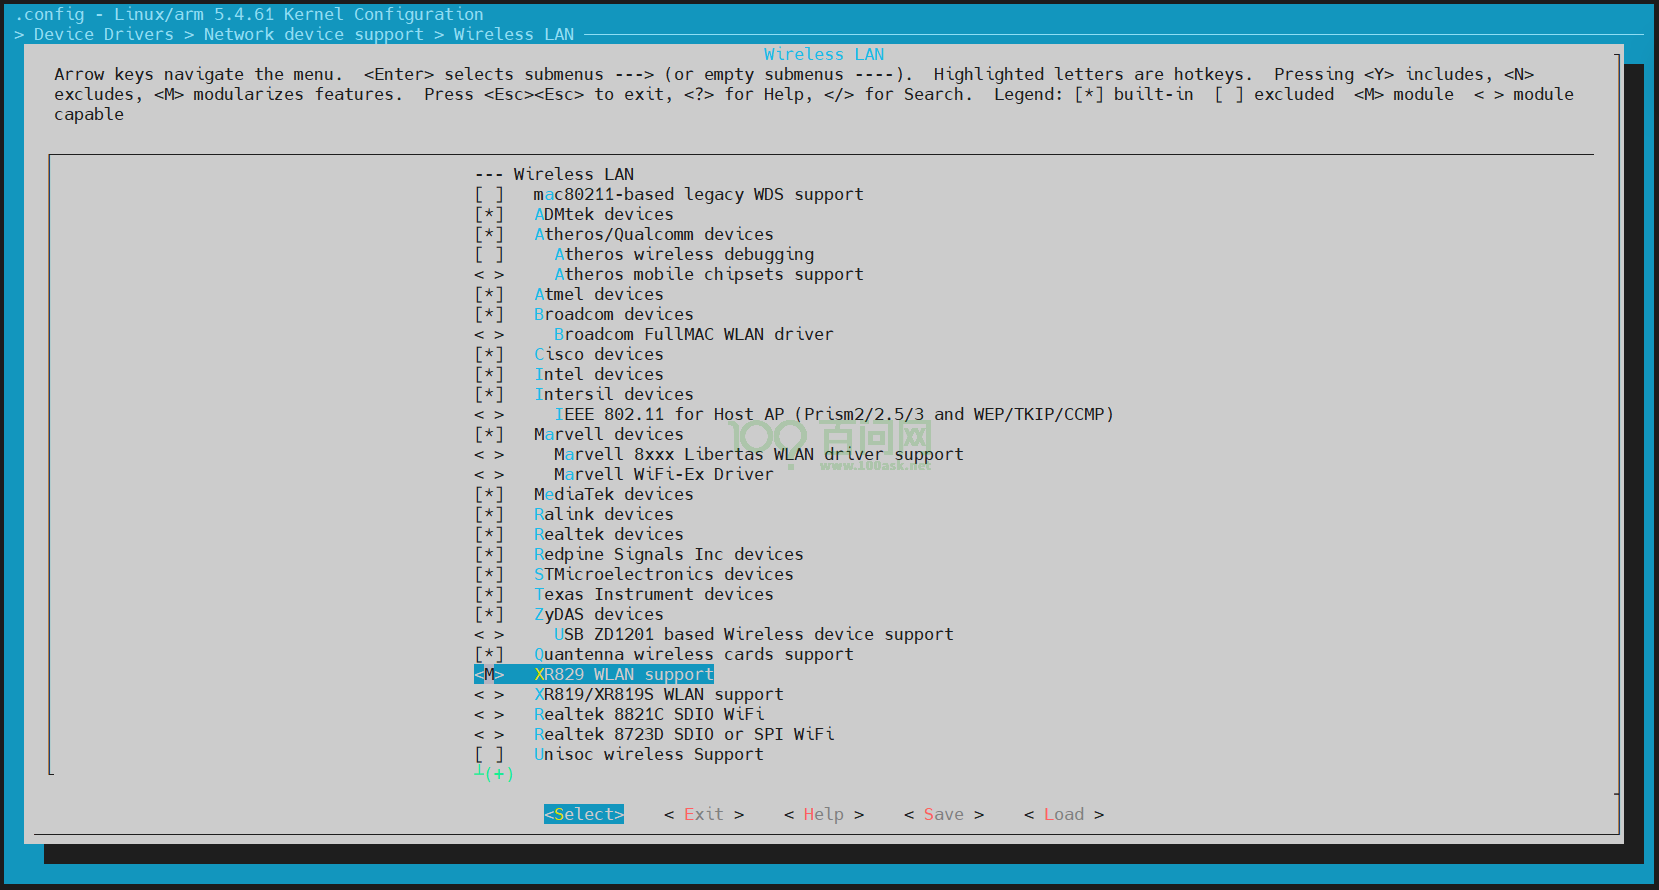
控制键盘上的方向键,选择Save,一路回车,保存完毕后,最后选择Exit,直到退出为止退出。
在TinaSDK源码目录下,执行./build.sh kernel
ubuntu@dshanpi:~/meihao/t113i_tinasdk5.0-v1$ ./build.sh kernel
========ACTION List: build_kernel ;========
options :
INFO: build kernel ...
INFO: prepare_buildserver
INFO: Prepare toolchain ...
Building kernel
...
Copy boot.img to output directory ...

sun8iw20p1 compile all(Kernel+modules+boot.img) successful


INFO: build dts ...
INFO: Prepare toolchain ...
removed '/home/ubuntu/meihao/t113i_tinasdk5.0-v1/out/t113_i/evb1_auto/buildroot/.board.dtb.d.dtc.tmp'
removed '/home/ubuntu/meihao/t113i_tinasdk5.0-v1/out/t113_i/evb1_auto/buildroot/.board.dtb.dts.tmp'
'/home/ubuntu/meihao/t113i_tinasdk5.0-v1/out/t113_i/kernel/build/arch/arm/boot/dts/.board.dtb.d.dtc.tmp' -> '/home/ubuntu/meihao/t113i_tinasdk5.0-v1/out/t113_i/evb1_auto/buildroot/.board.dtb.d.dtc.tmp'
'/home/ubuntu/meihao/t113i_tinasdk5.0-v1/out/t113_i/kernel/build/arch/arm/boot/dts/.board.dtb.dts.tmp' -> '/home/ubuntu/meihao/t113i_tinasdk5.0-v1/out/t113_i/evb1_auto/buildroot/.board.dtb.dts.tmp'
'/home/ubuntu/meihao/t113i_tinasdk5.0-v1/out/t113_i/kernel/staging/sunxi.dtb' -> '/home/ubuntu/meihao/t113i_tinasdk5.0-v1/out/t113_i/evb1_auto/buildroot/sunxi.dtb'
ubuntu@dshanpi:~/meihao/t113i_tinasdk5.0-v1$
Tina配置选择
1.添加xr829固件
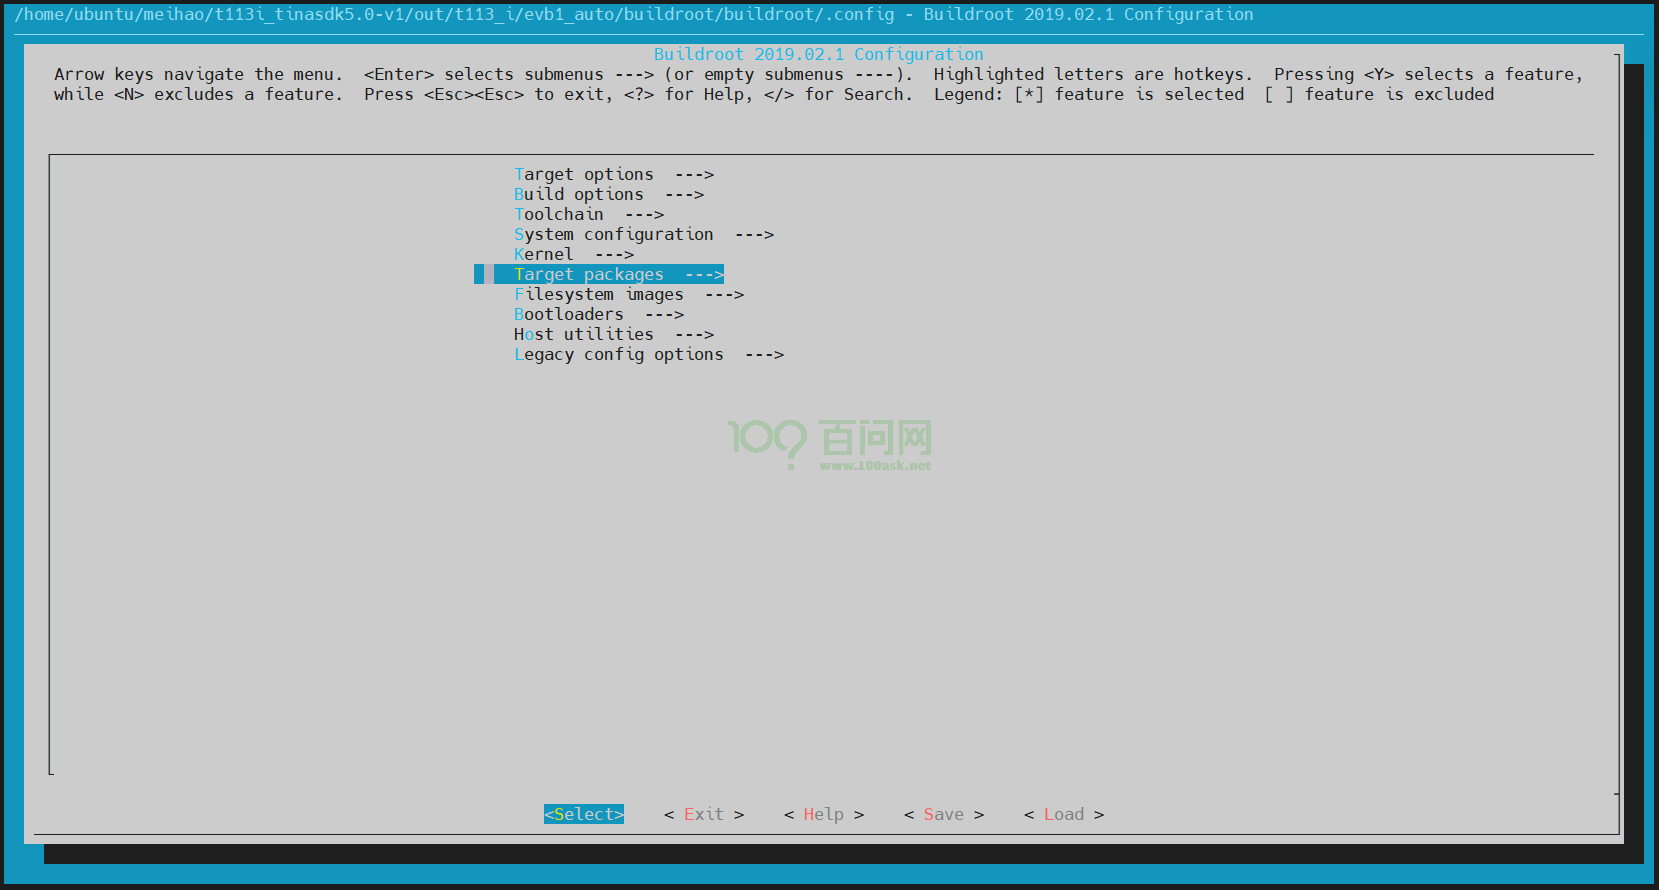
在TinaSDK源码目录下,执行./build.sh buildroot_menuconfig,进入Tina配置界面。
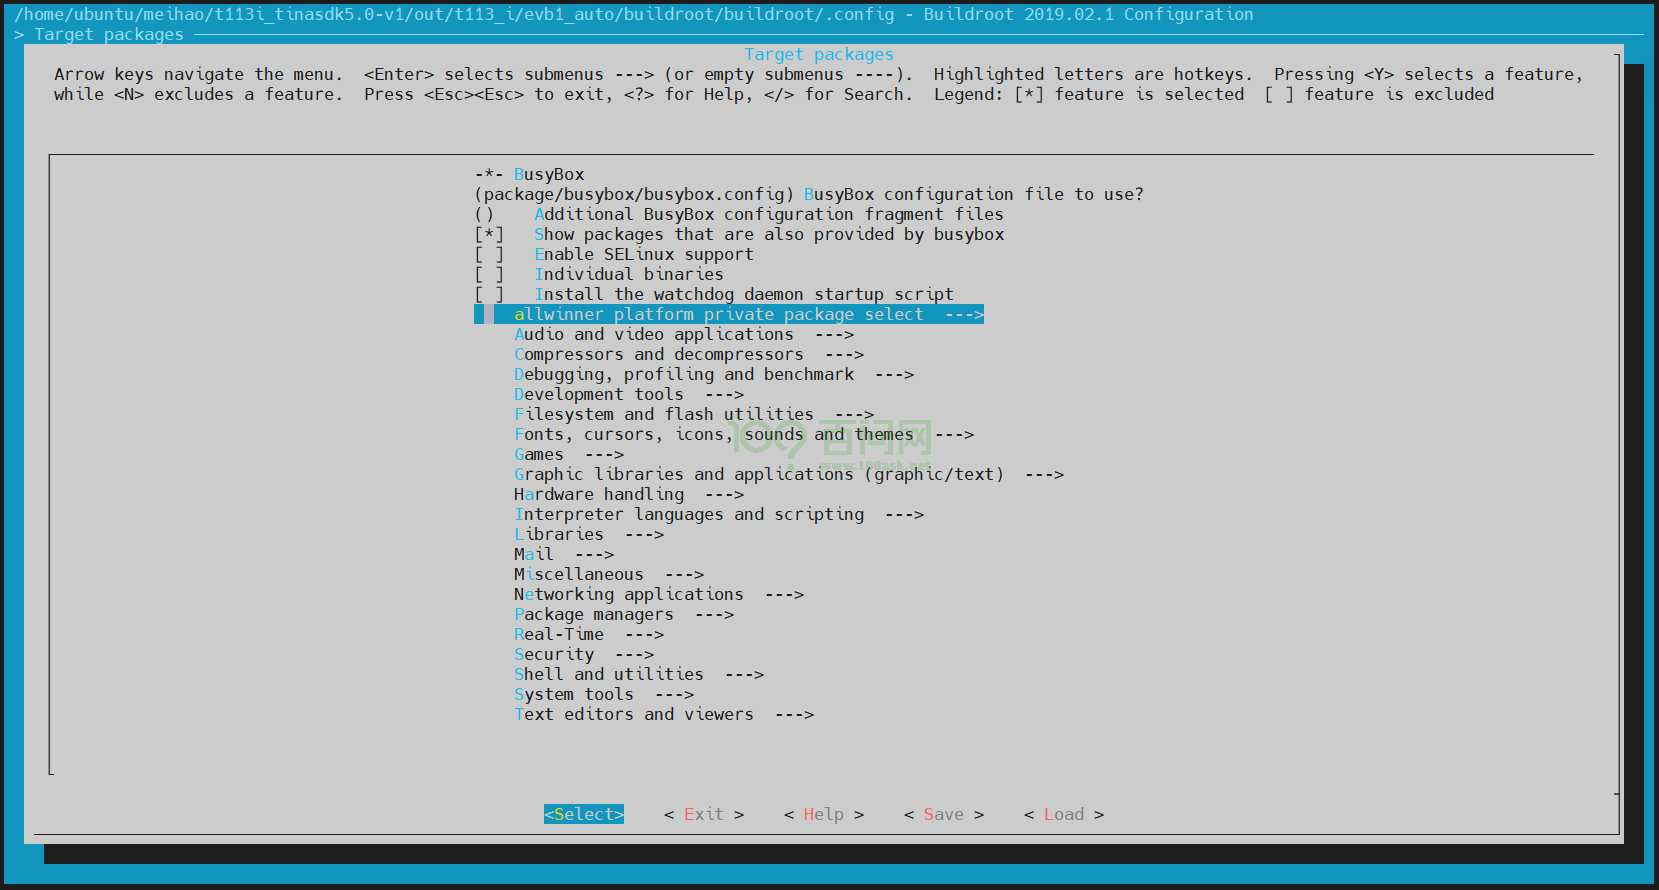
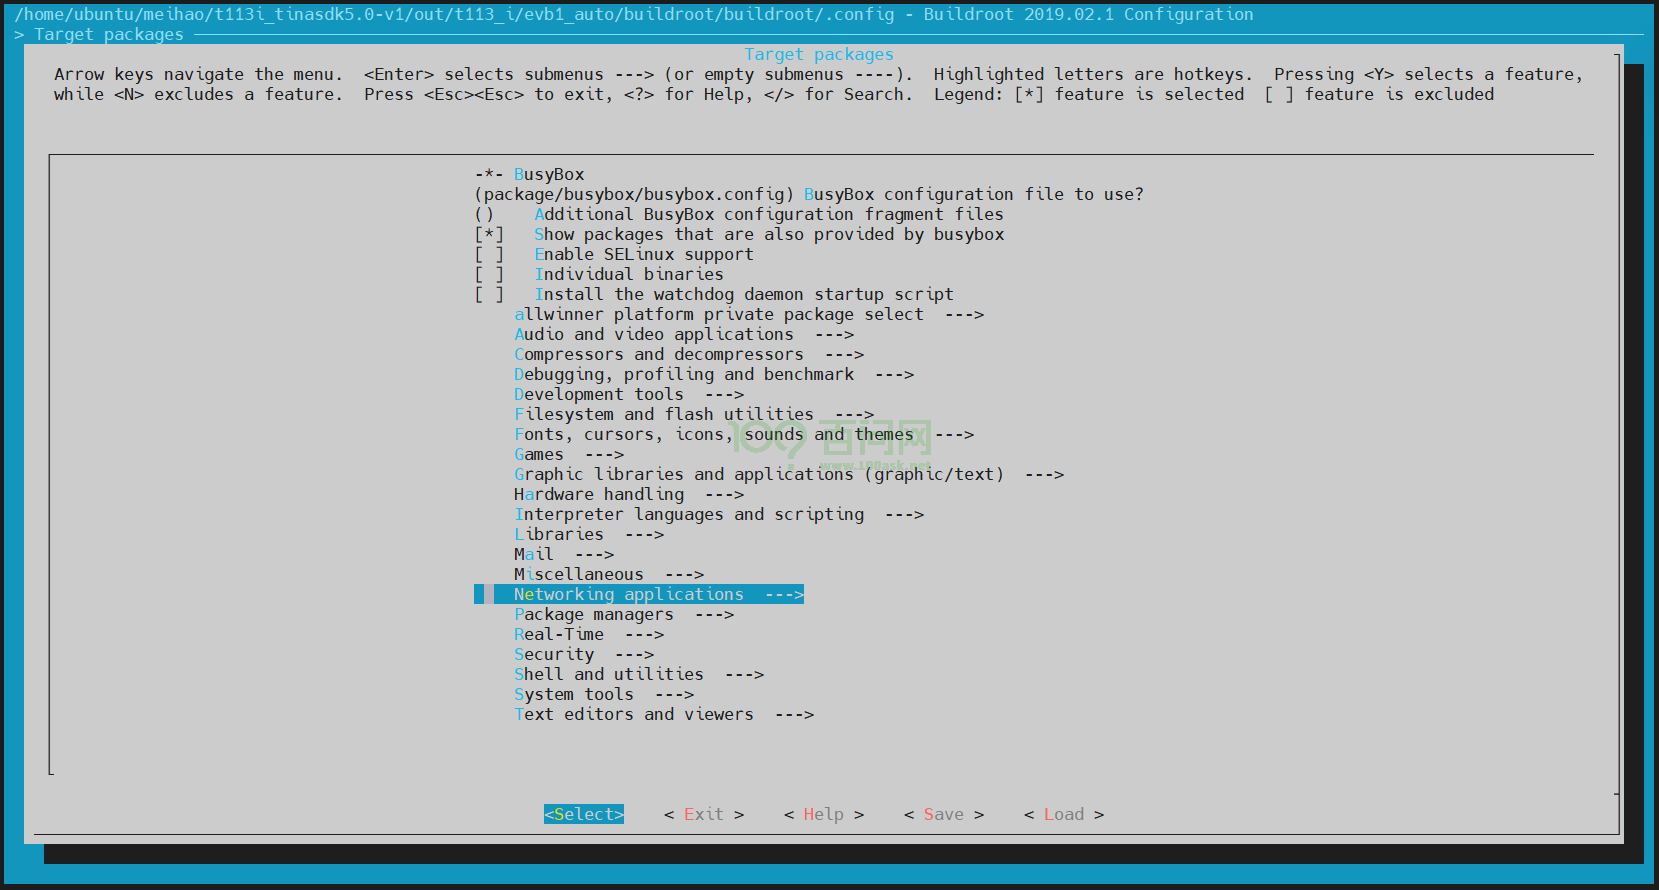
找到Target packages,回车进入。
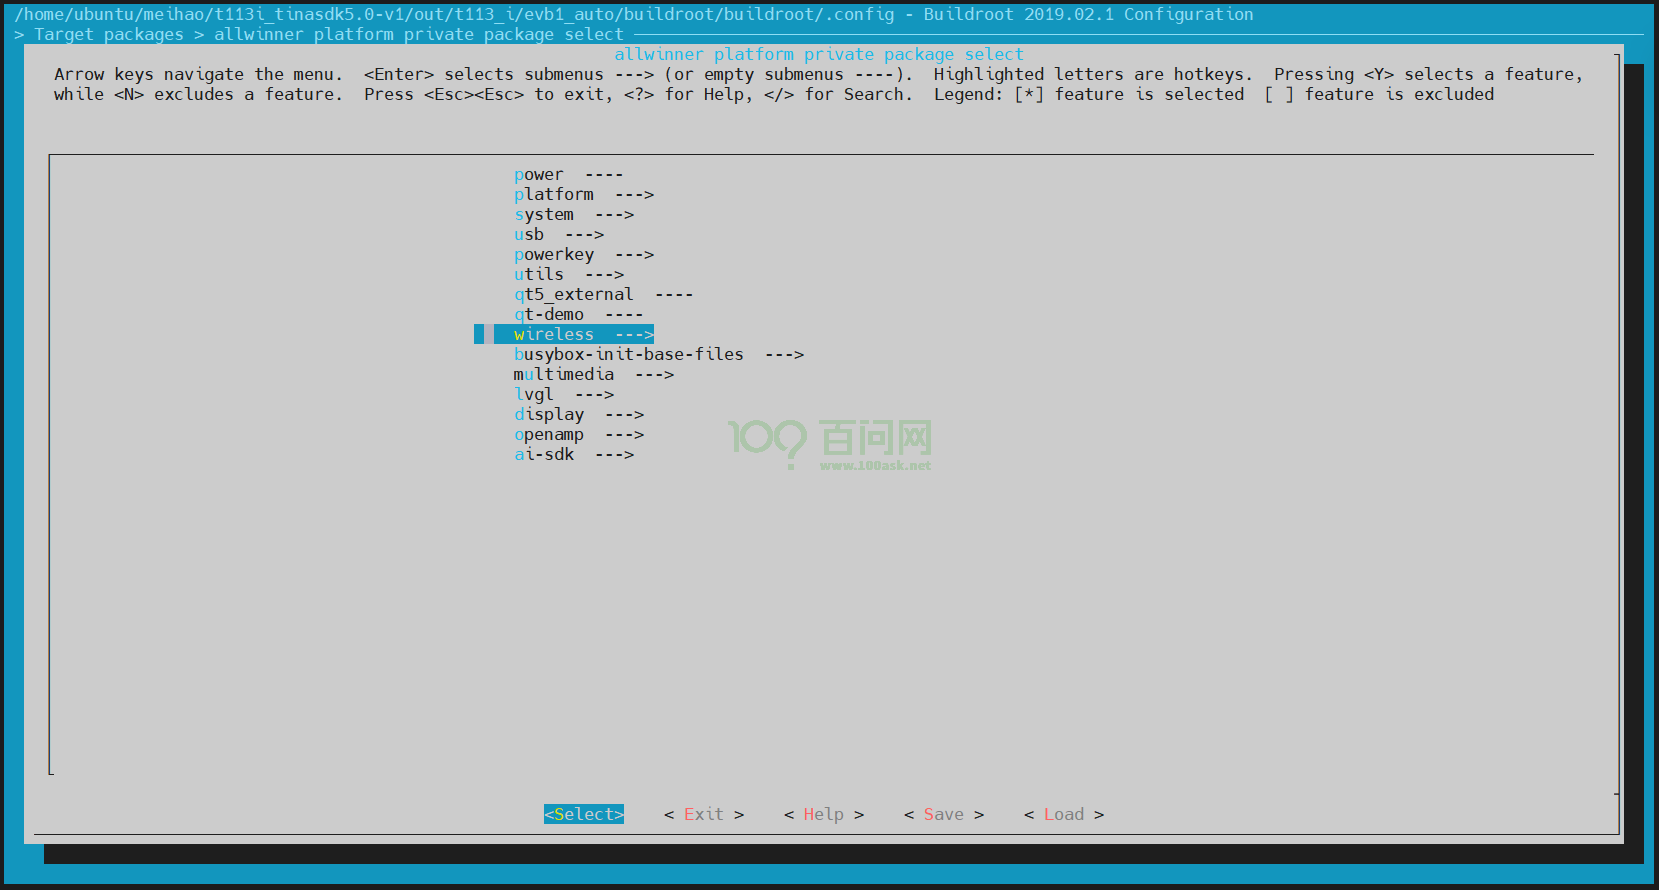
找到allwinner platform private package select,回车进入。
找到wireless,回车进入。
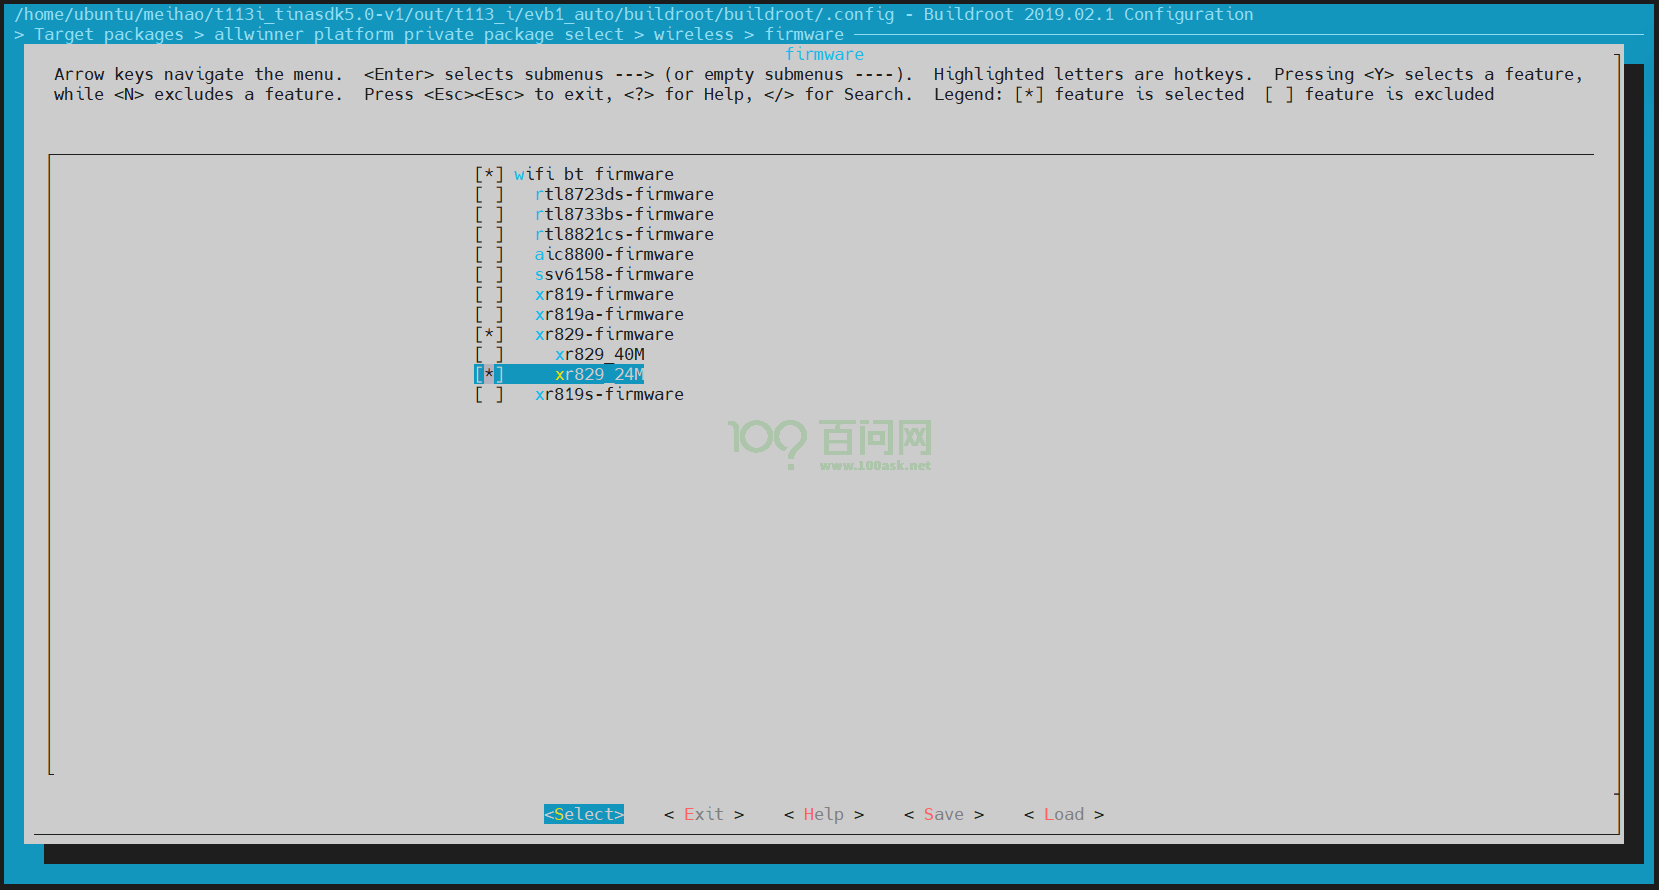
找到firmware,回车进入。
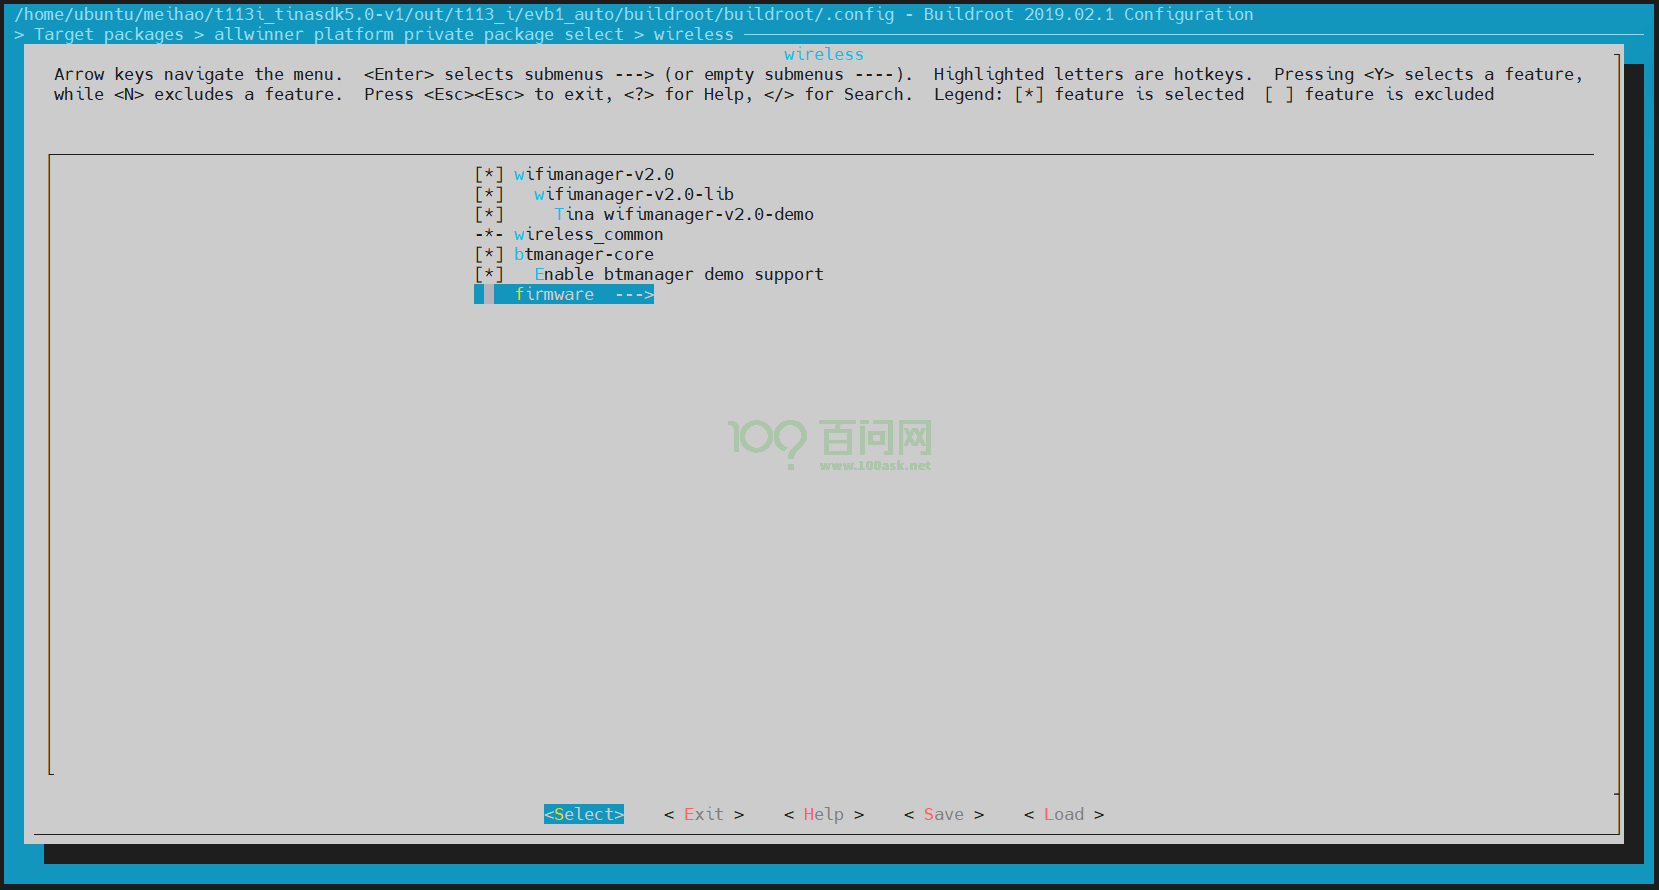
先点击键盘y,选择xr829-firmware,然后选择xr829_24M,因为板子上xr829芯片旁边用的晶振是24M的。
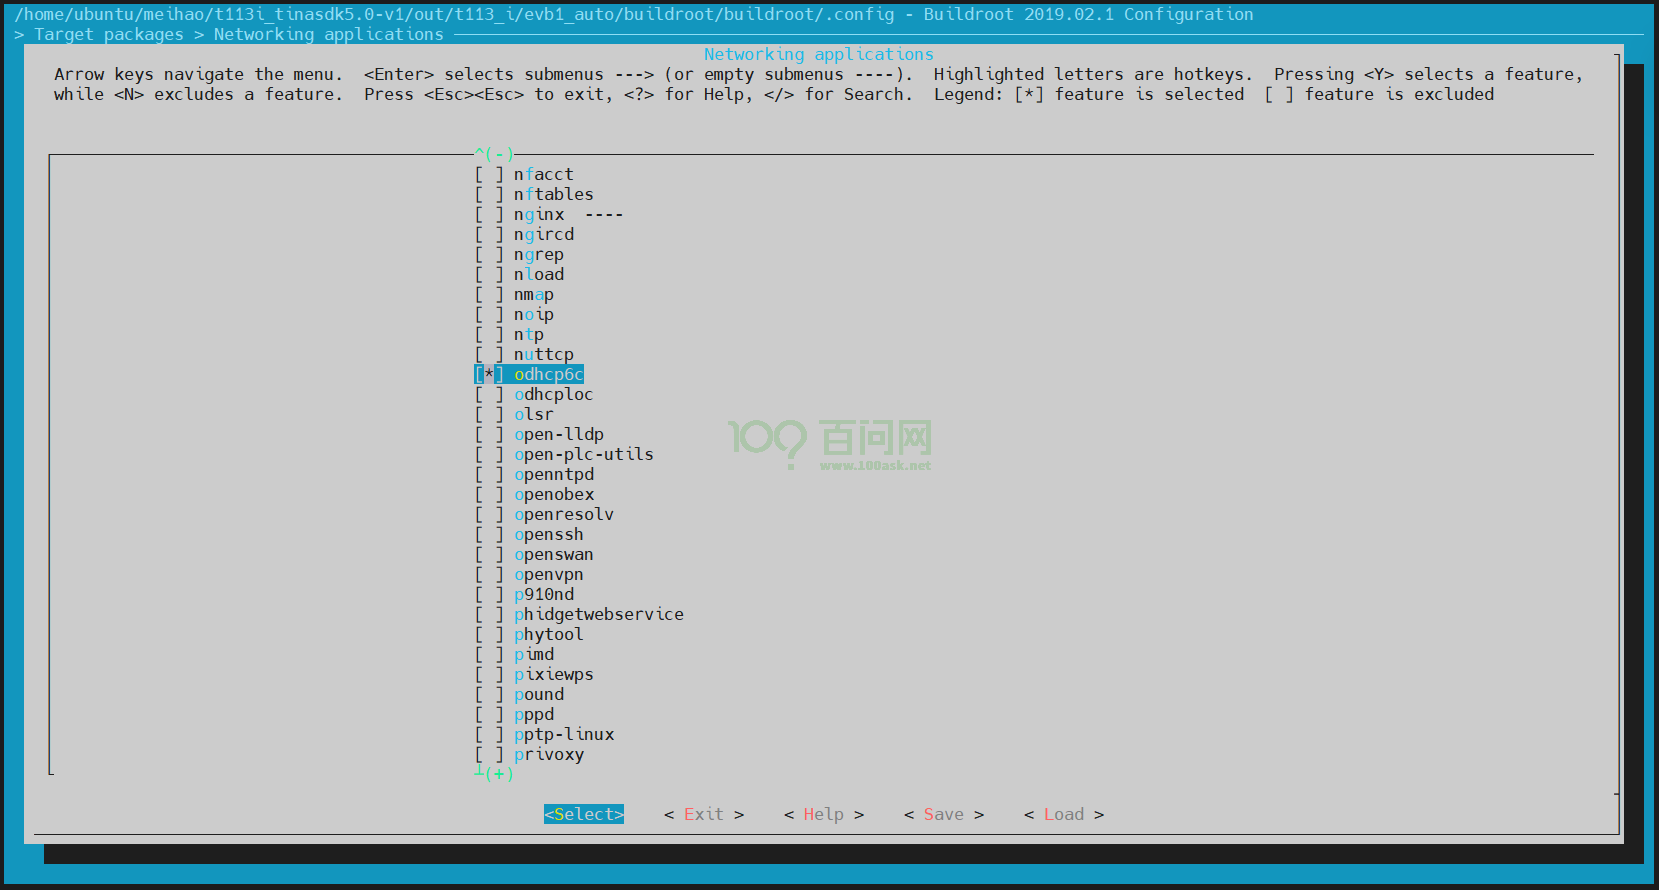
2.开启odhcp6c
odhcp6c的核心作用在于简化并自动化IPv6网络环境下的地址配置过程,确保设备能够顺利接入并通信。
接着上面的操作,退出到Target packages下,找到Networking applications,进入。
找到odhcp6c,点击键盘y,选上。
控制键盘的方向键,选择Save,一路回车,保存完毕后,最后选择Exit,直到退出为止。
编译打包更新
在TinaSDK源码目录下,执行./build.sh编译。
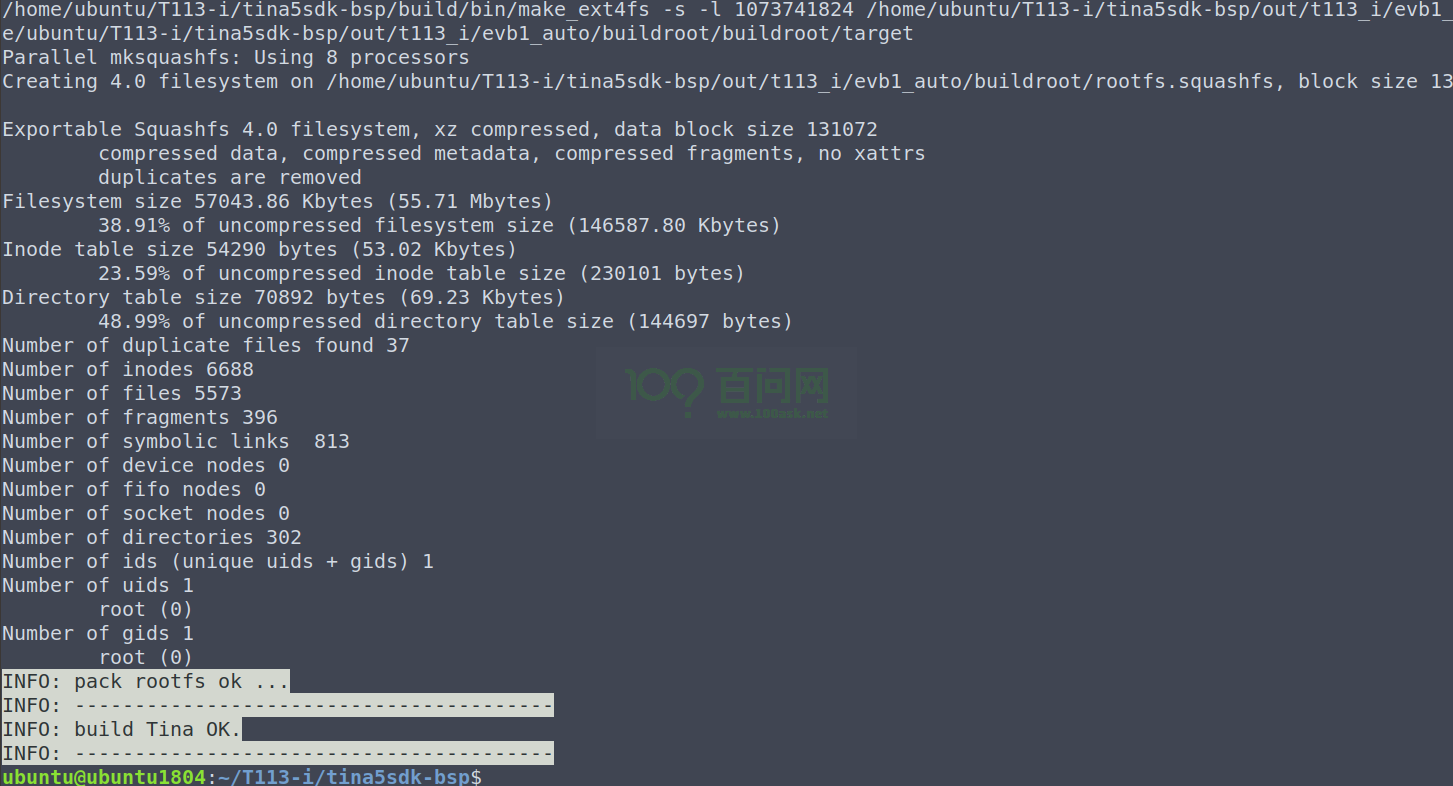
编译完成后,输入./build.sh pack
ubuntu@dshanpi:~/meihao/t113i_tinasdk5.0-v1$ ./build.sh pack
========ACTION List: mk_pack ;========
options :
INFO: packing firmware ...
INFO: /home/ubuntu/meihao/t113i_tinasdk5.0-v1/out/t113_i/common/keys
copying tools file
copying configs file
copying product configs file
linux copying boardt&linux_kernel_version configs file
...
update gpt file ok
update mbr file ok
/home/ubuntu/meihao/t113i_tinasdk5.0-v1/tools/pack/pctools/linux/eDragonEx/
/home/ubuntu/meihao/t113i_tinasdk5.0-v1/out/t113_i/evb1_auto/pack_out
Begin Parse sys_partion.fex
Add partion boot-resource.fex BOOT-RESOURCE_FEX
Add partion very boot-resource.fex BOOT-RESOURCE_FEX
FilePath: boot-resource.fex
FileLength=dad400Add partion env.fex ENV_FEX000000000
Add partion very env.fex ENV_FEX000000000
FilePath: env.fex
FileLength=20000Add partion env.fex ENV_FEX000000000
Add partion very env.fex ENV_FEX000000000
FilePath: env.fex
FileLength=20000Add partion boot.fex BOOT_FEX00000000
Add partion very boot.fex BOOT_FEX00000000
FilePath: boot.fex
FileLength=920800Add partion rootfs.fex ROOTFS_FEX000000
Add partion very rootfs.fex ROOTFS_FEX000000
FilePath: rootfs.fex
FileLength=b260880Add partion amp_rv0.fex AMP_RV0_FEX00000
Add partion very amp_rv0.fex AMP_RV0_FEX00000
FilePath: amp_rv0.fex
FileLength=29eb8BuildImg 0
Dragon execute image.cfg SUCCESS !
----------image is at----------

266M    /home/ubuntu/meihao/t113i_tinasdk5.0-v1/out/t113_i_linux_evb1_auto_uart0.img

pack finish
ubuntu@dshanpi:~/meihao/t113i_tinasdk5.0-v1$
打包完成后,根据前面开发环境搭建章节的烧写方式把镜像 t113_i_linux_evb1_auto_uart0.img 烧写到开发板上。