CVBS摄像头抓图
本章节将讲解如何在 T113i-Industrial 开发板上使用cvbs摄像头抓取图像数据。
前提条件
操作之前,先做好以下准备。
硬件:
- T113i-Industrial 开发板
- usb typeC线 X2
- cvbs摄像头
软件:
- 全志线刷工具:AllwinnertechPhoeniSuit.zip
- 全志USB烧录驱动:AllwinnerUSBFlashDeviceDriver.zip
- 镜像(支持tvd):T113i-DevKit-Support-TVD.7z
镜像说明:支持tvd功能,md5值:855c07003183cfe2d26a7339f962ca0e
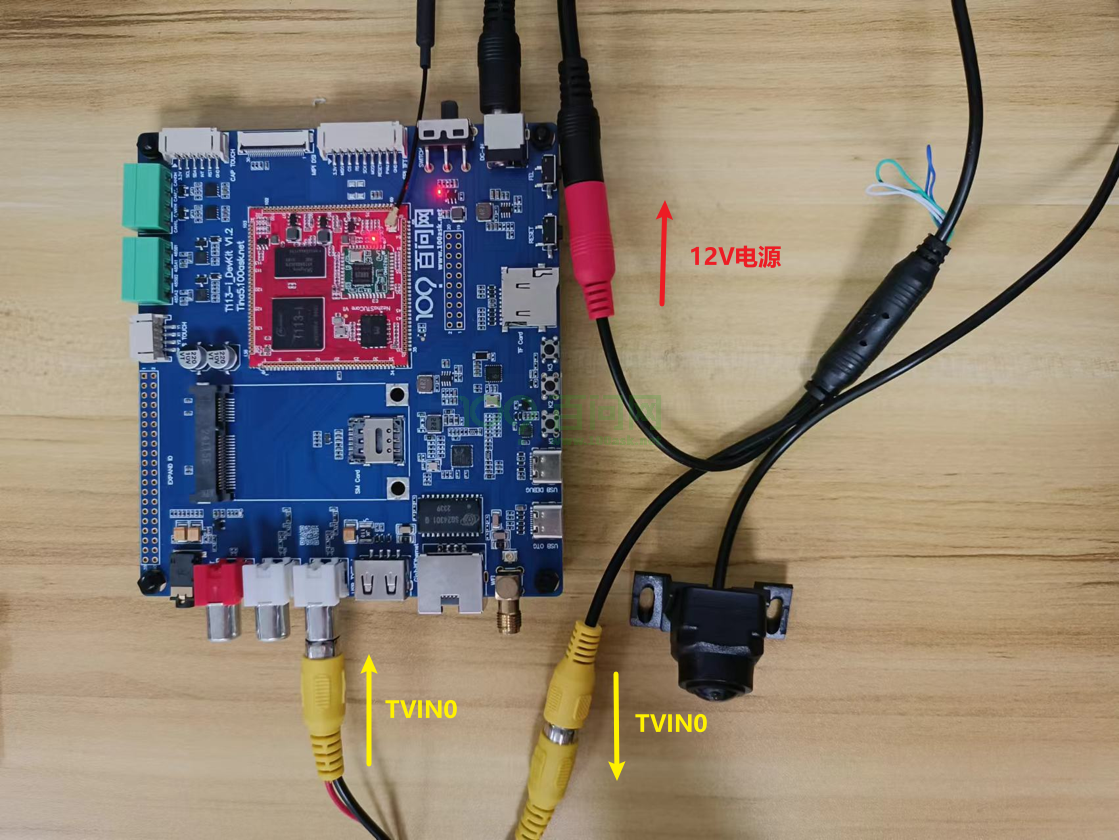
硬件连接
要使用cvbs摄像头获取图像数据,如果只单独购买了 T113i-Industrial 开发板,还需另外购买cvbs摄像头。下面图片是将cvbs摄像头连接到 T113i-Industrial 开发板的指南。
硬件介绍
TVD功能特性
在全志内部,通常把 CVBS IN 模块称为 TVD 或者 TVIN 模块,是一个用于采集模拟 CVBS 视频的硬件模块,可将输入的 CVBS 信号或 YPbPr 信号转换成 YUV 信号。
驱动框架
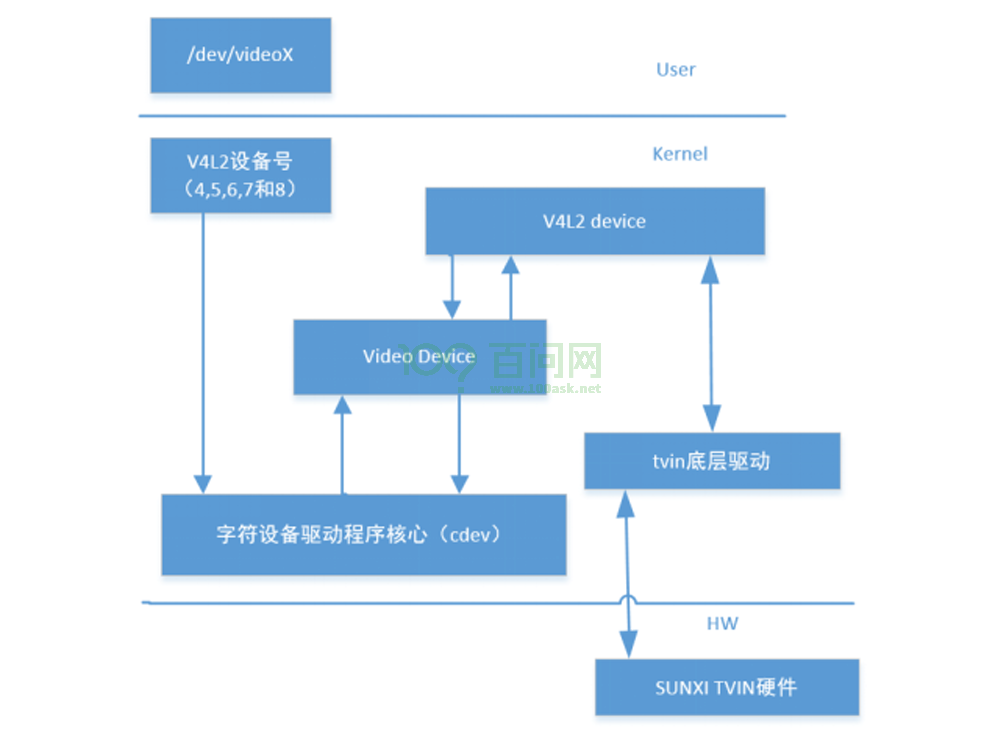
tvd 驱动只是负责把tvd的硬件描述完成并注册进V4L2框架,具体对tvd的使用还是放在用户态的应用层。这里归纳关于用户态操作使用tvd模块的流程。
登录开发板终端
进行抓图前,先登录开发板终端,如果不知道如何登录,请参考前面《快速启动》章节里的启动开发板文章。
获取抓图工具
在Ubuntu上,执行以下指令,获取资源:
git clone https://e.coding.net/weidongshan/tina5/APP-DevExample.git
下载的资源里面,源码在文件夹 V4L2/camera_demo_v1。
ubuntu@dshanpi:~/meihao/APP-DevExample/V4L2/camera_demo_v1$ tree -L 1
.
├── camerademo   #一个准备好的应用程序
├── makefile
├── Makefile
├── README.md
└── src

1 directory, 4 files
这个文件夹下的README.md 文档里有编译抓图工具的使用教程。
抓图工具使用介绍
抓图工具是使用一个 camerademo 应用测试程序,下面将讲解如何使用。
进入串口终端,执行以下指令,查看 camerademo 使用方法:
camerademo --help
查看结果如下:
[CAMERA]**********************************************************
[CAMERA]*                                                        *
[CAMERA]*              this is camera test.                      *
[CAMERA]*                                                        *
[CAMERA]**********************************************************
[CAMERA]******************** camerademo help *********************
[CAMERA] This program is a test camera.
[CAMERA] It will query the sensor to support the resolution, output format and test frame rate.
[CAMERA] At the same time you can modify the data to save the path and get the number of photos.
[CAMERA] When the last parameter is debug, the output will be more detailed information
[CAMERA] There are eight ways to run:
[CAMERA]    1.camerademo --- use the default parameters.
[CAMERA]    2.camerademo debug --- use the default parameters and output debug information.
[CAMERA]    3.camerademo setting --- can choose the resolution and data format.
[CAMERA]    4.camerademo setting debug --- setting and output debug information.
[CAMERA]    5.camerademo NV21 640 480 30 bmp /tmp 5 --- param input mode,can save bmp or yuv.
[CAMERA]    6.camerademo NV21 640 480 30 bmp /tmp 5 debug --- output debug information.
[CAMERA]    7.camerademo NV21 640 480 30 bmp /tmp 5 Num --- /dev/videoNum param input mode,can save bmp or yuv.
[CAMERA]    8.camerademo NV21 640 480 30 bmp /tmp 5 Num debug --- /dev/videoNum output debug information.
[CAMERA]    8.camerademo NV21 640 480 30 bmp /tmp 5 Num 1 --- 1/2: chose memory: V4L2_MEMORY_MMAP/USERPTR
[CAMERA]**********************************************************
- camerademo : 使用默认参数进行摄像头测试,不输出调试信息。
- camerademo debug : 使用默认参数进行摄像头测试,并输出更多的调试信息。
- camerademo setting : 允许用户选择分辨率和数据格式进行测试,不输出调试信息。
- camerademo setting debug : 允许用户选择分辨率和数据格式进行测试,并输出调试信息。
- camerademo NV21 640 480 30 bmp /tmp 5 : 使用指定的像素格式(NV21)、分辨率(640x480)、帧率(30fps)、图像格式(bmp)、保存路径(/tmp)和保存图片数量(5)进行测试,可以保存为bmp或yuv格式。
- camerademo NV21 640 480 30 bmp /tmp 5 debug : 与第5点相同,但额外输出调试信息。
- camerademo NV21 640 480 30 bmp /tmp 5 Num : 与第5点相同,但允许指定摄像头设备号(Num),用于多摄像头系统。
- camerademo NV21 640 480 30 bmp /tmp 5 Num debug : 与第6点相同,但允许指定摄像头设备号。
- camerademo NV21 640 480 30 bmp /tmp 5 Num 1 : 与第8点相同,但额外选择内存管理机制(1代表V4L2_MEMORY_MMAP或USERPTR)。
抓图测试
camerademo 抓图工具,默认情况下,使用的设备号是/dev/video0,查看开发板的tvd设备节点是否满足默认节点。
在串口终端中,执行以下指令:
ls /dev/
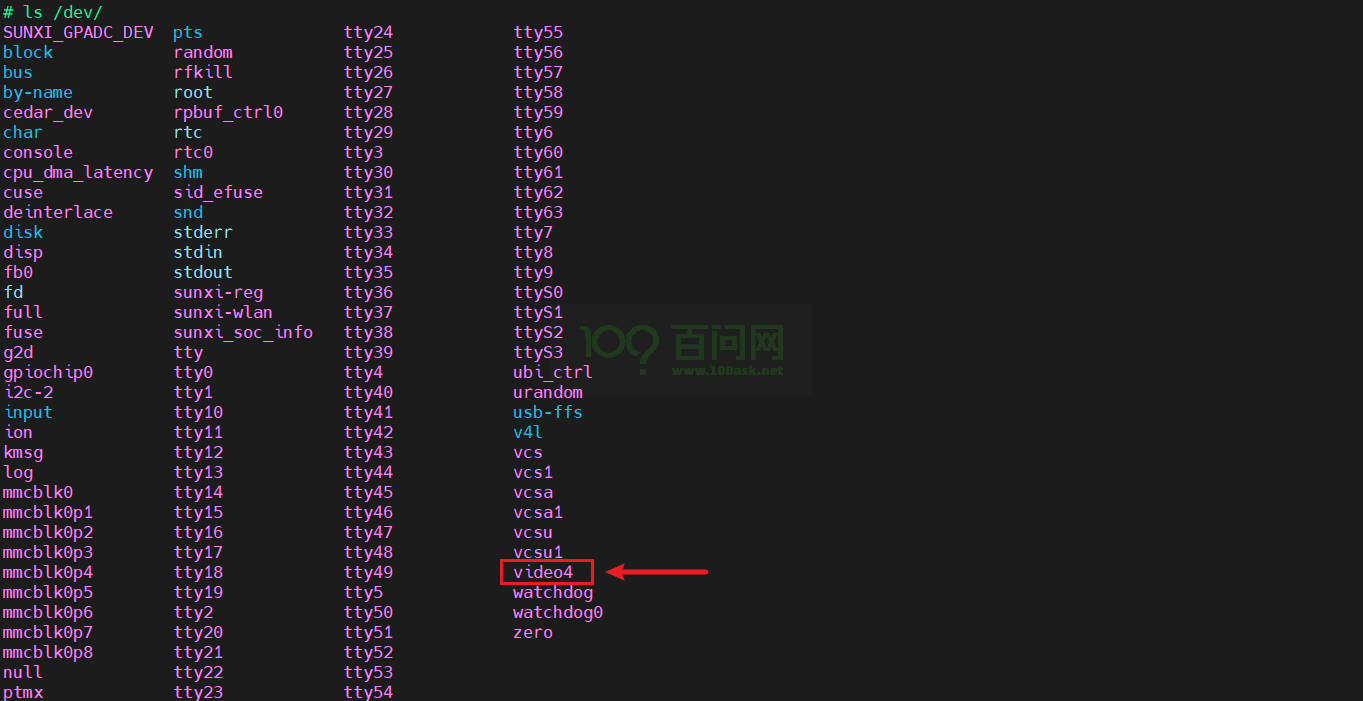
可以看到设备号是/dev/video4,不是默认的设备节点,所以不可以直接执行 camerademo 指令抓图。需要使用camerademo NV21 640 480 30 bmp /tmp 5 4,来指定设备号为/dev/video4。
准备工作完成后,现在来进行抓图测试,执行以下指令:
camerademo NV21 720 480 30 bmp /tmp 5
注意:
该分辨率,只支持 “640 480” 和 “720 480” ,摄像头能否使用 camerademo 抓图也与分辨率有关。
执行结果如下:
# ./camerademo NV21 720 480 30 bmp /tmp 5 4
[1970-01-01 00:18:05] WARNING: awplayer <cdx_log_set_level:30>: Set log level to 3
[1970-01-01 00:18:05] ERROR  : awplayer <ReadPluginEntry:198>: read plugin entry adecoder-14 fail!
[1970-01-01 00:18:05] ERROR  : awplayer <ReadPluginEntry:198>: read plugin entry vdecoder-10 fail!
INFO   : cedarc <CedarPluginVDInit:80>: register h264 decoder success!
INFO   : cedarc <CedarPluginVDInit:84>: register mjpeg decoder success!
INFO   : cedarc <CedarPluginVDInit:86>: register mpeg2 decoder success!
[1970-01-01 00:18:05] WARNING: awplayer <DlOpenPlugin:112>: Invalid plugin,function CedarPluginVDInit not found.
INFO   : cedarc <CedarPluginVDInit:98>: register mpeg4dx decoder success!
INFO   : cedarc <CedarPluginVDInit:79>: register mpeg4H263 decoder success!
INFO   : cedarc <CedarPluginVDInit:90>: register mpeg4Normal decoder success!
[1970-01-01 00:18:05] ERROR  : awplayer <DlOpenPlugin:103>: dlopen 'libawwmv3.so' fail: libawwmv3.so: cannot open shared object file: No such file or directory
[1970-01-01 00:18:05] ERROR  : awplayer <CdxPluginLoadList:235>: load vdecoder id vdecoder.wmv3 fail!
INFO   : cedarc <CedarPluginVDInit:85>: register h265 decoder success!
INFO   : cedarc <CedarPluginVDInit:73>: register vp8 decoder success!
[1970-01-01 00:18:05] ERROR  : awplayer <ReadPluginEntry:198>: read plugin entry plugin-0 fail!
[CAMERA]**********************************************************
[CAMERA]*                                                        *
[CAMERA]*              this is camera test.                      *
[CAMERA]*                                                        *
[CAMERA]**********************************************************
[CAMERA]**********************************************************
[CAMERA] open /dev/video4!
[CAMERA]**********************************************************
[CAMERA]**********************************************************
[CAMERA] The path to data saving is /tmp.
[CAMERA] The number of captured photos is 5.
[CAMERA] save bmp format
[CAMERA]************************[  506.457851] [tvd] vidioc_s_fmt_vid_cap:1623
[  506.457851] interface=0
[  506.457851] system=NTSC
[  506.457851] format=0
[  506.457851] output_fmt=YUV420
********************************[  506.476529] [tvd] vidioc_s_fmt_vid_cap:1627
[  506.476529] row=1
[  506.476529] column=1
[  506.476529] ch[0]=0
[  506.476529] ch[1]=0
[  506.476529] ch[2]=0
[  506.476529] ch[3]=0
**
[CAMERA] Using format parame[  506.498019] [tvd] vidioc_s_fmt_vid_cap:1629
[  506.498019] width=720
[  506.498019] height=480
[  506.498019] dev->sel=0
ters NV21.
[CAMERA] camera pixe[  506.513595] [tvd] tvd_cagc_and_3d_config:1481 tvd0 agc auto mode
lformat: NV21
[CAMERA] Resoluti[  506.523037] [tvd] tvd_cagc_and_3d_config:1490 tvd0 CAGC enable:0x1
on size : 720 * 480
[CAMERA] The photo save path is /tmp.
[CAMERA] The number of photos taken [  506.540539] [tvd] tvd_cagc_and_3d_config:1517 tvd0 3d enable :0x5f100000
is 5.
[CAMERA] Camera capture framerate is 0/0
[CAMERA] VIDIOC[  506.551252] [tvd] vidioc_streamon:1712 Out vidioc_streamon:0
_S_FMT succeed
[CAMERA] fmt.type = 1
[CAMERA] fmt.fmt.pix.width = 720
[CAMERA] fmt.fmt.pix.height = 480
[CAMERA] fmt.fmt.pix.pixelformat = NV21
[CAMERA] fmt.fmt.pix.field = 1
[CAMERA] stream on succeed
[CAMERA] camera4 capture num is [0]
[  506.604952] [tvd] tvd_isr:810 In tvd_isr
[CAMERA_PROMPT] the time interval from the start to the first frame is 78 ms
[CAMERA] camera4 capture num is [1]
[CAMERA] camera4 capture num is [2]
[CAMERA] camera4 capture num is [3]
[CAMERA] camera4 capture num is [4]
[CAMERA] Capture thread finish
[CAMERA] close /dev/video4
图片保存的路径在/tmp目录下,
# ls /tmp/
bmp_NV21_1.bmp    bmp_NV21_4.bmp    dnsmasq.leases    subsys
bmp_NV21_2.bmp    bmp_NV21_5.bmp    fw_printenv.lock
bmp_NV21_3.bmp    dbus              messages
#
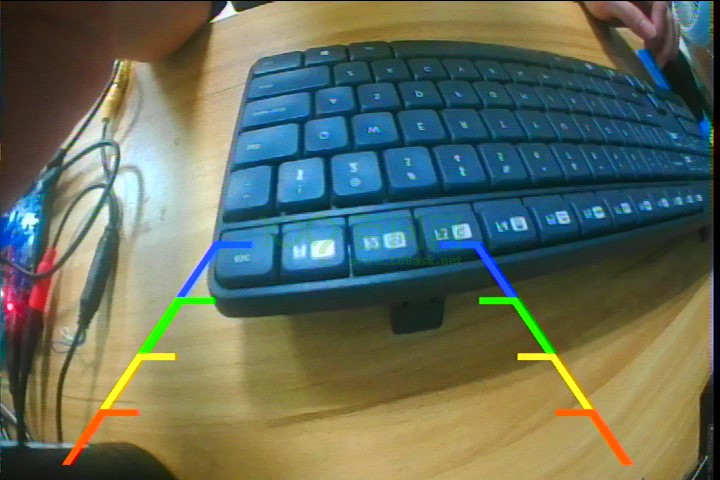
查看图片
图片抓图后,如何去查看图片呢?
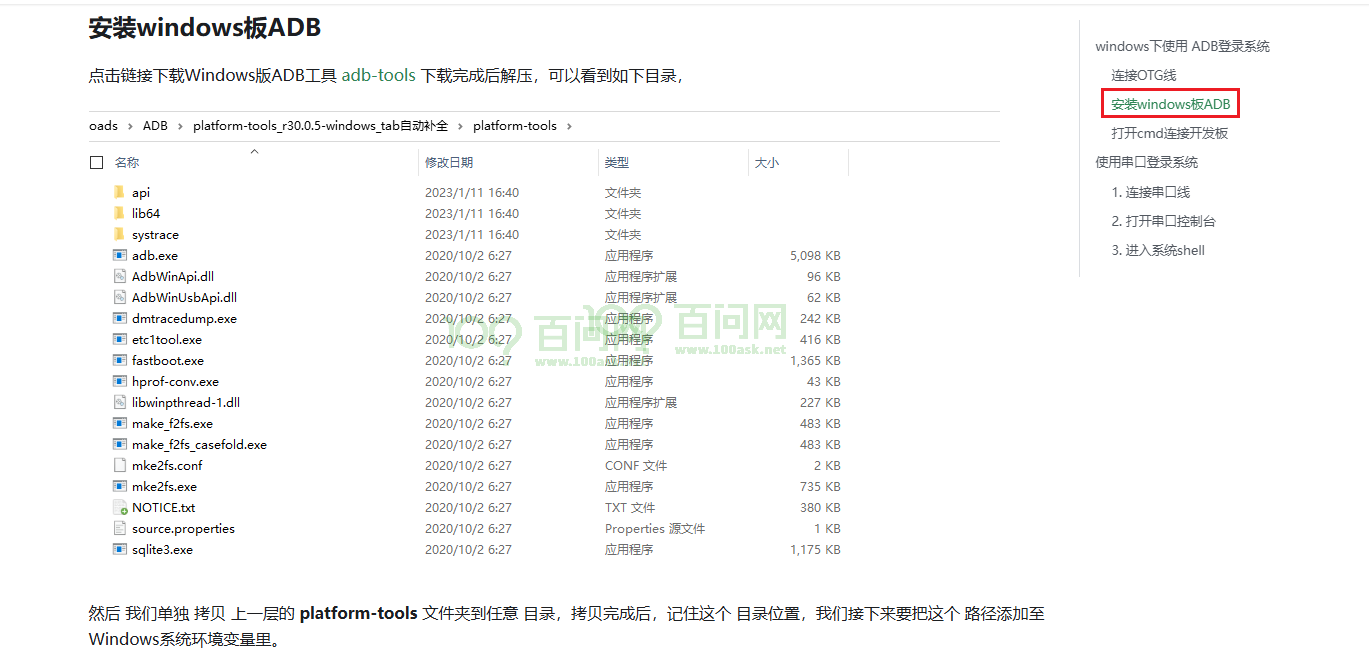
强烈建议使用adb工具,拉取到Windows,直接使用Windows默认的查看图片工具打开图片。
如果不知道在Windows上使用adb工具,请参考启动开发板 | 东山Π (100ask.org)
执行 win + r,打开对话框,执行adb devices

可以看到识别到开发板的adb设备,接下来,拉取一张图片,在对话框上,执行以下指令
adb pull /tmp/bmp_NV21_3.bmp .
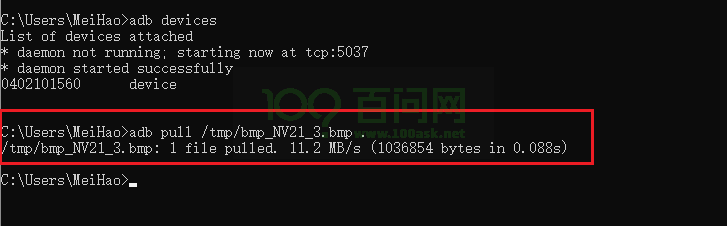
拉取成功,找到相应的位置。
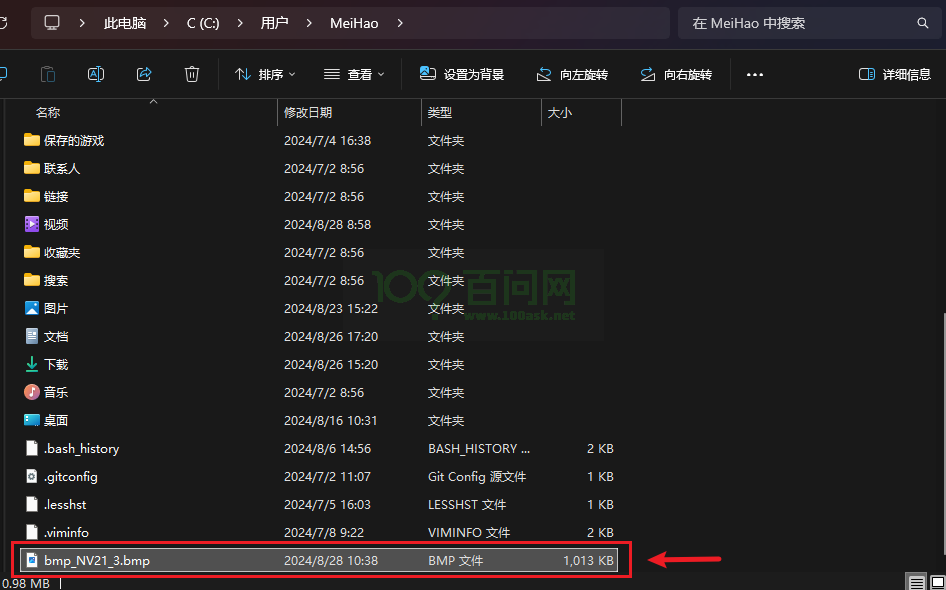
双击直接打开,即可查看图片: